


.webp)

Top 7 SMS OTP service providers to secure your customers | How to choose the right one?
Choosing the right OTP provider requires defining your requirements and goals, vetting various providers, and understanding how well each solution works with your existing tech stack.
At the most practical level, your SMS OTP service provider should give you all the features you need to deliver OTPs to your customers.
Every SMS one-time passcode (OTP) service provider is different.
Some providers offer a more extensive network of carrier partnerships, enabling you to send OTPs worldwide with better deliverability. Others focus on building a strong infrastructure to manage domestic OTP deliveries.
OTP providers also vary in the availability and flexibility of APIs and SDKs for integration into existing systems, impacting the ability to customize and implement the OTP experience in your existing tech stack.
Choosing the right OTP provider requires defining your requirements and goals, vetting various providers, and understanding how well each solution works with your existing tech stack.
In this guide, we’ll explain the features you need to look for in an SMS OTP service provider, the top seven most popular SMS OTP service providers in the market, and how to choose the right one for your needs.
What features should I look for in an SMS OTP service provider?
Consider eight features when choosing an SMS OTP service provider.
- Time-to-deploy
- SMS OTP conversion rates
- Fraud detection
- Security and compliance
- Analytics and tracking
- Integrations
- Customer support
- Price
1. Time-to-deploy
Developers already have enough on their plates— and adding a complicated tool t that requires intensive onboarding and implementation is counterproductive to achieving your other development needs.
When selecting an OTP provider, look for services that require minimal setup. This will allow your team to start sending OTPs with little to no downtime.
Your SMS OTP service provider should also provide clear documentation and SDKs that make it straightforward for developers to integrate OTP with your platforms, significantly reducing the time and resources needed for deployment.
2. SMS OTP conversion rates
One of the most frustrating experiences a customer can have is receiving a delayed OTP, or worse, not receiving an OTP at all. Delayed or undelivered OTPs can cause anxiety, potentially leading the customer to abandon the transaction or lose trust in your brand.
Verify that an SMS OTP provider has high delivery rates to ensure that your customers can receive and act upon OTP messages.
3. Fraud detection
In international markets, OTPs in SMS and voice channels are particularly susceptible to SMS Pumping fraud.
Advanced fraud detection should include dynamic risk assessment algorithms that adapt to emerging threats and unusual patterns.
4. Security and compliance
When assessing the security and compliance of an OTP service provider, there are two key aspects you need to consider: data encryption and regulatory compliance.
End-to-end encryption ensures that an OTP is encrypted at the origin and only decrypts at the receiver’s device. This protects the OTP message from being intercepted or read by hackers. To verify the robustness of the encryption, look for an OTP service provider that uses recognized standards like AES (Advanced Encryption Standard) with a suitable key length (e.g., 256-bit).
Additionally, look for OTP service providers that adhere to data protection regulations like the General Data Protection Regulation (GDPR) in the European Union, the California Consumer Privacy Act (CCPA), and the Health Insurance Portability and Accountability Act (HIPAA) as they are mandatory for different countries.
5. Analytics and tracking
Choose an SMS OTP service provider that offers detailed analytics and tracking. Real-time insights into OTP delivery rates and failures help identify issues as they arise.
Custom reports with a trend analysis of KPIs, such as success rates of OTP deliveries across different regions, can highlight areas for improvement, whether in technology or carrier partnerships. You can also leverage these reports to make strategic decisions and draw behavioral insights.
6. Integrations
Even the most robust OTP provider must play well with your existing tech stack. Think about which platforms you need your OTP tool to communicate with. Does this OTP solution fit your long-term technological needs?
Plivo, for example, integrates with most popular tools including Zapier, Microsoft Power Automate, Integromat, Pipedream, Integrately, GitHub Actions, EngageBay, and more.
7. Customer support
Look for an SMS OTP service provider that is available 24/7. This level or service translates to immediate assistance, minimized downtime, and enhanced reliability. Having multiple support channels, such as email, phone, web-based chatbots, and SMS, will also provide more convenience, accessibility, and personalization for your company.
8. Price
There’s no getting around pricing. Look for an OTP service provider with clear, straightforward pricing. Most OTP providers offer multiple pricing plans; look for one designed to scale with your business as you grow. Check out Plivo’s pricing.
The 7 best SMS OTP service providers for security and reliability
Here are our top seven picks for the best OTP service providers. Read a detailed analysis of why we chose these platforms below.
1. Plivo

Key features
- Turnkey single-API solution: All you need to do is integrate using a single API with Plivo and it’ll take care of the heavy lifting. For instance, Plivo keeps numbers ready for usage, so customers do not need to purchase any numbers separately. Bottom line: Plivo customers can conveniently use a secure solution without worrying about compliance issues.
- Multichannel support: Plivo supports both SMS and voice OTP to ensure businesses have the flexibility they need to authenticate users.
- High deliverability: Verify API enjoys specialized routes from carriers that are not available with the SMS API. It also uses intelligent routing to identify optimal routes and number types for enhanced conversions. Plivo also ensures sender ID and template compliance to ensure carriers do not fail them due to compliance issues.
- Built-in fraud control: Plivo’s Fraud Shield includes an autopilot mode to help you monitor your messaging patterns, build thresholds for each country, and automatically send alerts with irregular patterns.
You can fine-tune and override messaging throughput thresholds for each country and access an in-built reporting to evaluate your cost savings from preventing fraud attacks using Fraud Shield.
- Support: Premium 24-hour support, comprehensive documentation, seven global points of presence, and 99.99% uptime SLAs are available.
- No additional costs: Plivo has straightforward pricing plans where you only pay for what you use. There are no charges for authentication, regulatory compliance, fraud shield, and SMS verification, making it an ideal solution for those on a modest budget.
{{cta-style-1}}
Pros
- Supports SMS OTP delivery in 220+ countries
- High deliverability rates, minimizing SMS failures
- Customizable OTP templates for a personalized user experience
- Detailed analytics for tracking OTP success rates
- Robust security features protect data integrity
- Comprehensive API and documentation support ease of integration
- Scalable solutions cater to businesses of all sizes
- 99.99% uptime SLAs available with 24-hour support
Cons
- The vast array of features can be overwhelming for new users.
Most suitable for Companies that need a scalable, customizable SMS OTP solution with extensive integration capabilities, security, and reliability. G2 rating: 4.5 stars, 724 reviews
2. Twilio

Key features
- Multichannel authentication support: Twilio provides APIs that enable you to send OTPs through SMS, passkeys, WhatsApp, email, voice, and TOTP (authenticator apps like Authy and Google Authenticator), going beyond traditional email and website communication.
- Fraud monitoring: Twilio uses one API endpoint to validate users and detect fraud. It also lets you customize geo-permissions, rate limits, and other fraud controls.
Pros
- Wide range of additional communication channels available
- Extensive API for custom integrations and workflow automation
- Fraud detection and security features to protect customer data
- Real-time analytics dashboard to monitor and optimize OTP deliveries
- Global reach with localized number support
Cons
- Steeper learning curve due to platform complexity
- Pricing can become expensive as usage scales.
Most suitable forTech-savvy businesses and developers seeking a robust, customizable OTP solution.
3. Authkey.io

Key features
- Multichannel support: Authkey.io supports SMS, email, and voice OTP.
- Live analytics: It gives detailed analytics about OTP delivery, failure, and latency reports.
Pros
- Cost-effective solution for businesses on a tight budget
- User-friendly platform ideal for those new to OTP services
- API support for straightforward integration
- Quick and easy setup with minimal configuration required
- Responsive customer support team
Cons
- Limited advanced features for complex implementations
- Somewhat restricted global coverage compared to larger providers
Most suitable forStartups and small to medium businesses looking for an affordable, reliable OTP service with basic features.
4. Exotel

Key features
- Real-time analytics: Exotel provides real-time analytics and delivery reports, allowing businesses to track the status of each OTP code sent.
- Customizable OTP timers and lengths: Exotel allows users to customize the length of the OTPs and set timers for how long an OTP is valid.
Pros
- Simple and intuitive user interface
- A reporting dashboard with conversational AI
- An extensive reach in the Asia-Pacific (APAC) and Southeast Asia (SEA)
- High delivery speed for OTPs
Cons
- Limited global presence
Most suitable forBusinesses primarily operating in APAC & SEA, as they have an extensive network in this region.
5. SMSCountry

Key features
- Quick integration: SMSCountry allows you to send OTPs directly from anywhere with an easily integrable SMS API that supports several applications through SDK, XML, Web, and HTTP-API plug-ins.
- Compliance and security: The OTP provider is powered by 100+ direct-to-carrier connections in 180+ countries, enabling users to send OTPs internationally.
Pros
- Easy to use and integrate, reducing time to market
- Supports 180+ countries
- Cost-effective for businesses mindful of budget constraints
- Real-time delivery reports for tracking OTP status
- Dedicated account management and 24/7 customer support
Cons
- Limited functionality for advanced customization needs
- Fewer global direct carrier connections may affect delivery in certain regions.
- No option to add team members from the dashboard
Most suitable for SMBs seeking a reliable, no-frills basic OTP service that's both affordable and easy to implement.
6. MSG91

Key features
- Built-in IP security: The OTP service provider comes with in-built IP data security that ensures the flow is halted when an unusual login is attempted to prevent potential fraud activities.
- Multichannel support: MSG91 supports multiple channels including SMS, email, Voice, and Whatsapp.
Pros
- Robust APIs for flexible OTP service integration
- Comprehensive analytics for insights into OTP performance
- Global coverage ensuring worldwide OTP delivery
- Advanced data security protocols for customer data protection
- Scalable pricing model that accommodates growing businesses
- Exceptional uptime and reliability track record
Cons
- Pricing transparency could be improved for clearer budget planning.
- The platform's extensive features present a learning curve.
- Limited reports—only offers a pre-selected timeframe for accessing reports.
Most suitable forBusinesses that need multichannel support with other basic functionalities of an OTP provider.
7. TeleSign

Key features
- Global coverage: Telesign’s verification API can authenticate customers across 230 countries and over 80 languages.
- Dynamic routing: The OTP provider’s API intelligently routes messages using the most effective routing available to provide high-speed delivery.
Pros
- Extensive global network for reliable OTP delivery across different regions
- Support for a wide range of languages and localizations
- Developer-friendly APIs and SDKs for easy integration
Cons
- Inflexible pricing plans with plenty of friction in free trials
- Significant delay in receiving OTPs
- Lacks accurate number validation
- Doesn’t support its entire list of countries and numbers
Most suitable for Startups and small businesses needing a simple, budget-friendly OTP solution.
How to choose an SMS OTP service provider?
There is a wide range of SMS OTP service providers on the market right now—but how do you decide which one meets your needs best?
If choosing an OTP provider feels daunting, here are six steps to help:
Step 1: Determine your OTP requirements and goals
Before diving into the selection process, get clear on your specific needs for an OTP service. Consider things like the data security level of your application, the volume of OTPs you'll need to dispatch, and whether you anticipate significant growth as this will require a scalable solution.
Step 2: Look at key features
Jot down a list of the must-have and nice-to-have features you need from your OTP provider, like high deliverability rates, speed of OTP delivery, the ability to customize your OTP messages, and authentication flows.
Step 3: Research the best OTP service providers
Begin your search by compiling a list of potential OTP providers. Read online reviews, testimonials, and case studies to explore each provider's reputation.
Step 4: Set your OTP provider budget
Seek out pricing plans that offer transparency and don't hide fees in the fine print. Consider how the pricing structure fits your expected volume of OTP messages and whether the provider offers the scalability you need without increasing costs.
Step 5: Check for integration support
Look for providers that offer robust support for integration, including SDKs, APIs, and comprehensive documentation. These tools and resources will significantly smooth the integration process and reduce the time to deployment.
Step 6: Test, analyze, and report on ROI
Once you’ve set up your new OTP system, take measures to determine its return on investment. The goal is to have an efficient tool with a positive ROI.
The bottom line is that regardless of which OTP service provider you choose, it must deliver on your goals. It should give you complete control and flexibility over how, when, and where you want to send OTPs.
Get started with Plivo today
Choosing the right SMS OTP service provider involves considering key factors. Start by understanding your business’s needs and goals, listing out specific of your must-have and nice-to-have features like customization, global presence, and customer support.
Think Plivo might be the perfect OTP SMS service provider for your needs? Find out today with a trial.

Support Agents: Who Are They, and What Do They Do?
Support agents serve as a middle ground between your company and its customers. Let’s see some steps to hire the best and build a functional team.
Needless to say, customer support is a vital organ for business success, directly affecting customer satisfaction, loyalty, and revenue. In fact, a study notes that in 2024, poor customer experiences cost organizations worldwide an estimated $3.7 trillion, marking a 19% increase from the previous year.
Customers often switch companies if they don't receive good customer service, regardless of product satisfaction. Conversely, they are often willing to go out of their way to do business with a company that offers better service.

Support agents are at the forefront of delivering these sensitive experiences, making their role crucial in fostering customer relationships and driving business growth.
In this article, we’ll explain who they are, what they do, the essential skills needed to become one, and some steps to build your support team with the best support agents.
Who are support agents (and who are they not)?
A support agent is a trained representative of your company primarily tasked with resolving customers' complaints, answering inquiries, and providing usage guidance on your company’s products and services.
Beyond handling tickets, they also provide emotional support by ensuring customers feel heard, valued, and reassured throughout the interaction. This, in turn, strengthens customer trust and loyalty.
Support agents play a vital role in enhancing customer satisfaction—which indirectly drives ROI through repeat purchases—but they are not sales representatives or marketers. Marketers and sales reps acquire customers and sell.
On the other hand, support agents retain these customers and boost repeat purchases through efficient assistance.
4 primary responsibilities of a support agent
A support agent's primary responsibilities include serving as the first point of contact, handling queries, providing proactive support, and gathering essential feedback.
1. Serving as a brand's first-line contact
When things go wrong, customers become frustrated and demand to speak with anyone—even the CEO. Your support agents step in to act as the first line of defense, de-escalate situations, and provide solutions professionally.
They also represent your brand through every empathic response, ensuring customers leave with a positive experience and a lasting impression of excellent service.
2. Handling customer inquiries
Customer support agents handle all customer inquiries. Depending on the technicality of the query, they might sometimes involve a specialist or higher executive.
For instance, if a customer has a dispute over billing that involves policy exceptions, your agent might need to coordinate with or escalate to a higher executive for approval.
3. Providing proactive support
Support agents detect customer needs ahead of time and promptly contact them even before they log a complaint. This helps reduce inbound tickets and boosts customer satisfaction.
As an omnichannel customer support platform, Plivo CX’s proactive service enables your support team to provide a more refined and automated proactive support.

4. Gathering feedback to optimize product offerings and marketing
Your support agents are the most valuable source of feedback since they interact with customers daily. They can help you gather recurring concerns, pain points, and suggestions that drive meaningful product improvements.
Plivo CX’s metrics tool automates this feedback collection process and ensures your agents focus on core tasks instead.

Essential soft skills of a good support agent
Being a support agent involves not only resolving queries but also understanding and communicating with customers on a personal level. This is why certain soft skills, beyond technical competency, are essential when recruiting one.
Active listening and empathy
Active listening involves paying close attention to every word and emotion communicated rather than focusing solely on the problem.
Unsurprisingly, active listeners excel at expressing empathy since they’re more likely to understand how customers feel better. This deeper connection allows them to communicate effectively, provide reassurance, and de-escalate tense situations.
Good communication skills
A good support agent must convey their points concisely while considering the appropriate tone.
They know when to avoid passive-aggressive words such as “actually, ought to,” colloquialisms, and slang to maintain clarity.

Adaptability
Different customers present with different complaints, personalities, and communication styles. Some are patient and easy to communicate with, whereas some are aggressive and impatient.
So, a one-size-fits-all approach won’t work, and that’s why an ideal support agent must be able to adapt to each high and low while maintaining efficient support delivery.
Problem-solving skills
Customer support playbooks are valuable, but not every customer complaint will fit neatly into predefined solutions. Situations like this require your support agent to think outside the box while staying within your company’s guardrails.
A good support agent must be able to devise quick solutions to new problems and escalate as soon as possible when necessary.
6 steps to hire the right support agent and build a functional support team
Your support team can either make or mar your business. Hiring the right agent and building a functional team is, therefore, essential. Let’s see how to do that.
1. Define your staffing needs and ideal agent
You can figure out how many support agents to hire based on your historical ticket volume, scale of business expansion, and anticipated growth in the next quarters. This ensures you don’t over-hire and bloat your expenses or under-hire and cripple your support delivery.
Plivo CX’s reporting and metrics tool provides a comprehensive ticket summary, which helps you determine your historical ticket volume.

Simultaneously, you need to define who your ideal agent is—that is, the skills they should preferably possess, availability, technical proficiency, lingual capacities, and experience. You can diversify your recruitment process if you’re catering to multilingual audiences.
Once you’ve identified your staffing needs and ideal candidate profile, you can post your job listing on your company’s career page and on popular job boards like LinkedIn to attract qualified applicants.
2. Prioritize agents with empathy and problem-solving skills
You need a team of agents who can dialogue with different kinds of customers, resonate with them emotionally, and make them feel heard while providing adequate support. That’s why you should prioritize agents with empathy.
Also, look for agents with strong problem-solving skills—someone who can think quickly on their feet and provide solutions to out-of-the-script problems.
Tools like TestGorilla and Testify help you assess your applicant’s skills and ability to address different scenarios. For a more tailored assessment, present candidates with real scenarios or past customer complaints from your database and ask them to resolve the issue.
3. Test for relevant technical competency
Technical competency is your support agent’s ability to resolve customers’ technical queries. This could include troubleshooting software issues and providing answers to product-specific technical queries.
Usually, your agents don’t need to be tech geeks or specialists for L1 tickets. An entry-level customer support agent with the necessary soft skills can do a great job here.
However, it’s a different ball game for agents managing L2 and L3 tickets. They should have the necessary expertise to manage complex and product-related technical issues like specialists.
This primarily hinges on their hard skills portfolio, which you need to consider when hiring. Provide real-world scenarios to assess these skills and ensure they genuinely have what it takes to be your ideal agents.
4. Provide comprehensive agent training
From the onboarding stage, you need to identify the gaps in your hires’ competencies and design individualized or group training to boost their efficiency. Training can include soft skills, lingual capacity, and upskilling hard skills for more proficiency.
Agent training is not a one-time process. Plivo CX’s coaching tools help your agents leverage past interactions with customers to continuously refine their delivery—how to respond or handle similar situations when they arise again.
5. Equip your support agents with AI-powered tools
Gartner notes that more than 80% are either using or planning to integrate AI-powered chatbots in 2025. Advanced chatbots are essential because they can handle the majority of L1 tickets, thus freeing up your agents to do other complex tasks.
An example is Plivo CX’s openAI-powered AI chatbot, which can leverage your database in real time to make decisions, autonomously handle refund requests, modify orders, and make personalized recommendations.

Your team also needs an omnichannel platform that centralizes all communication channels into a single dashboard. This allows agents to access everything they need without constantly switching tabs, ultimately improving response time and efficiency.
An example is Plivo CX’s unified agent desktop designed to eliminate data silos, unify all incoming customer requests, and integrate with homegrown systems, CRM, ERP, helpdesk, and more.

6. Establish KPIs and reasonable expectations
Establish KPIs, such as first response time, average resolution time, and first contact resolution, to assess the efficiency and effectiveness of your support agents.
Customer Satisfaction Scores (CSATs) will help determine whether customers are getting the help they need and how they need it.
Plivo CX’s agent metrics and reporting tool enables you to monitor and measure your support agent’s performance while exposing gaps that need filling.

You also need to set individualized, SMART expectations and goals for your support agents. Ensure each agent does not handle more tickets—whether in quantity or complexity—than they can. This will reduce the incidence of customer service burnout and enhance the quality of your support delivery.
Scale your customer support operations with Plivo CX
Hiring the right support agent is just one part of building a functional customer support team. You also need to provide them with the right tools to enhance their efficiency and effectiveness.

That’s where Plivo CX comes in.
As an omnichannel platform designed to streamline support delivery, Plivo CX offers a unified agent desktop to centralize your support channels, multilingual AI-powered voice support, and OpenAI-powered chatbots to slash your ticket queue.
We also offer:
- Seamless integrations: Connect Plivo CX with your existing tools, including CRM, ERP, helpdesk, and more.
- Data-driven optimization: Track real-time analytics and generate custom reports to gain insights into customer interactions and agent performance.
- AI-enhanced efficiency: Prioritize urgent tickets, ensure brand consistency, and adapt quickly to changes with AI-powered support.
- Rich communication: Enhance interactions with multimedia support, including images, videos, and documents.
- Increased productivity: Streamline workflows with message templates, internal notes, and skills-based routing.
- Comprehensive features: Leverage call recording, IVR, multi-language support, and robust security features for a complete solution.
Book a demo today and start building a world-class support team with Plivo CX.

The Power of Multilingual Customer Support: 7 Must-Know Strategies
Multilingual customer support enhances user experience and expands global reach. Let’s explore its benefits and best practices for implementation.
It’s ten minutes past 2 pm. A new high-value customer submits a technical complaint—but, in Spanish. The problem? None of your service reps speak Spanish.
Now, you have only two options.
First, you say, “Thank you for reaching out. We currently accept queries only in English. Please resend your message in English so we can assist you. Thank you for your understanding!"
Or, you scramble from Google’s translator to other free versions of online interpreters, which might give you an inaccurate response.
Whichever you choose, your customer will likely not find it encouraging. Your inability to efficiently serve customers in their native language passes a message; that they’re not a valued part of your brand.
According to Hyken’s report, 65% of consumers want to be treated valuably. Failure to deliver this expectation results in a poor support experience, increased churn rates, and a negative brand reputation.
To avoid such outcomes, you need to implement multilingual customer support, and this article will show you how to do that.
What is multilingual customer support?
Multilingual customer support is the ability to provide consistent, high-quality assistance in multiple languages to your customers while accounting for geographical, cultural, and contextual differences that influence communication.
As your business scales, there is also an increasing need to serve a diverse market audience. This mandates your support team to be capable of sustaining interactions with individuals of different languages outside your native business borders.
Even within your business borders, you’re bound to interact with customers of different linguistic needs. According to the United States Census record, the number of residents who utilize other languages besides English has nearly tripled in the last decade.
So, you must be ready to cater to this diversity once necessary.
Benefits of multilingual customer support
Multilingual support increases customer satisfaction, boosts retention, and ensures you can tap into diverse markets for more opportunities. Here’s how it does that:
Improved customer satisfaction
According to Unbabel’s 2021 multilingual CX report, one in three global consumers cite a lack of multilingual support as their top concern in localized customer experience.
Uni- or bilingual provisions lead to frustration since your customers can’t express themselves the way they want, and this culminates in a bad customer experience.
On the other hand, providing multilingual support can enhance customer satisfaction and boost your customers’ LTV. This explains why 64% say they will pay more for a service or product if the brand offers a multilingual support service.
Higher customer retention
57% of global consumers see it as a bias when a brand fails to offer multilingual support. Two in three will also switch to another brand if their current brand does not offer broader language support.
But what happens if you fill up this communication gap? 73% of respondents in Unbabel’s survey say they will remain loyal.
This means multilingual provisions can help you retain your existing customers and also gain an edge over your competitors in attracting new ones.
Interestingly, 40% of consumers will likely overlook poor customer service many times if it is offered in their native language. This gives you enough time to address issues plaguing your support delivery before customers bounce.
Broader reach and competitive advantage
Scaling your business often requires crossing borders and serving new audiences. Multilingual support ensures you can easily resolve the issues coming up in these regions, eliminate communication barriers, and rapidly build a robust brand reputation.
Also, multilingual support can serve as the spearhead of your competitive advantage in new markets. That’s because your potential customers will likely choose you over competitors who do not offer multilingual support, all things being equal. So, you can make it a focus of your marketing strategy.
7 must-know strategies to implement multilingual support
One in four consumers say they will not spend more than $500 on brands offering limited language support. You can avoid this by implementing a sturdy multilingual support system.
Let’s go through how you can do that.
1. Be upfront about your available language options
First, inform your customers and audience about your current capacity. Include the languages you support on your website, applications, social media profiles, and customer support pages.

This helps to manage customer expectations and reduce frustrations pending the time you make provisions for multiple languages.
2. Embrace diversity in recruitment
The most direct approach to creating a multilingual support system is to recruit multilingual customer service reps. These reps are especially crucial for managing L2 and L3 tiers of requests that AI might not be able to handle.
Ensure you have at least one native or non-native representative for each region you serve. You can also organize language training for your existing service reps instead of overhauling the entire team.
This reduces your employee acquisition cost and helps you work with people already in tandem with your support operations.
3. Use AI chatbots to provide multilingual support
Advanced AI chatbots use ML and NLP to analyze user inputs such as complaints and provide appropriate responses while leveraging customer data. This is like having an inbuilt translation system, making them a good fit for handling multilingual L1 requests regardless of the language.
As an omnichannel platform designed to scale your support team, Plivo CX offers an OpenAI-powered chatbot capable of handling multilingual tickets and addressing your customers in the language they choose.
4. Integrate multilingual voice support
According to a 2024 report from Statista, 54% of customers prefer to resolve issues via phone calls over other digital channels and email. To cater to this group, you need to integrate multilingual voice support technology.
An example is Plivo CX’s voice software, which prompts your customers to choose their preferred language from over 27 supported languages right on the call.
With an integrated programmable IVR, your callers can self-select options for quicker routing, shorter wait times, and faster resolution.

5. Offer language preferences in self-service options
Self-service options include FAQs, knowledge bases, chatbots, AI-powered virtual assistants, and community forums. Your customers must be able to choose their preferred language of interaction on all of these platforms in order to cater to their needs.
Additionally, ensure that automated responses, IVR systems, and in-app customer support are available in multiple languages.

6. Train support agents in cultural sensitivity
Multilingual support should cater to lingua-cultural nuances that affect communication. Otherwise, you risk irking your customers.
For instance, there are certain words or expressions that might be normal in American English but seen as aggressive in British English.
One example is the word “sure.” To an American, it’s simply a means of acknowledgment. But it could come off as passive-aggressive to a non-American.
Train your support reps to understand these nuances and avoid them when speaking with individuals of different cultural backgrounds.
7. Localize knowledge base and FAQs
Language location refers to adapting your website content to a visitor’s regional language based on factors like their browser settings, IP address, or geographical location.
o do this, you first need to translate your knowledge base and FAQs into the different languages you support. You can do this manually or with AI. Then let your web development team handle the transitioning.
This method spares customers the hassle of manually selecting their preferred language. However, you should still offer a visible option on your support pages for them to adjust language preferences if needed.
Deliver modern multilingual support with Plivo CX
Language differences stifle quality support delivery and effective communication.
To help you, Plivo CX offers a multilingual omnichannel support system through its Unified Agent Desktop, OpenAI-powered agentic chatbot, and inclusive voice support to help you overcome these challenges.
We also offer:
- Seamless integrations: Connect Plivo CX with your existing tools, including CRM, ERP, helpdesk, and more.
- Data-driven optimization: Track real-time analytics and generate custom reports to gain insights into customer interactions and agent performance.
- AI-enhanced efficiency: Prioritize urgent tickets, ensure brand consistency, and adapt quickly to changes with AI-powered support.
- Rich communication: Enhance interactions with multimedia support, including images, videos, and documents.
- Increased productivity: Streamline workflows with message templates, internal notes, and skills-based routing.
- Comprehensive features: Leverage call recording, IVR, multi-language support, and robust security features for a complete solution.

SMS Lead Generation: Everything You Need to Get Started
Struggling with SMS lead generation? Learn how Plivo CX's AI-powered SMS marketing helps e-commerce brands drive conversions, automate campaigns & boost ROI.
Let’s be real—getting leads isn’t the problem. Getting them to engage? That’s the real challenge. You can have the best offer, but if your message is not seen, it won’t get results.
The good news is that SMS is breaking through the noise. In fact, 76.2% of consumers say SMS is more effective at generating actions that lead to a purchase than email.
Why? Because texts land directly in your customer’s hands—no spam filters, no distractions, just instant, personal communication.
SMS lead generation is quickly becoming a cornerstone of modern marketing. In this article, we’ll dive into why SMS lead generation is rapidly becoming a must-have for businesses looking to engage, convert, and grow their customer base.
Why SMS is an effective lead generation tool
SMS marketing is a powerful tool for lead generation. It helps businesses build and nurture a qualified audience directly through SMS. Here are some key advantages that make SMS so effective for lead generation:
High open rates & immediate attention
Text messages are almost always read – often within minutes. Studies confirm SMS open rates around 98%, higher than email. The immediate visibility means your lead-gen offers (coupons, event invites, etc.) get seen right away, capturing customer attention in real time.
💡 Pro tip: Time your SMS campaigns strategically—sending messages when customers are most active can increase engagement and conversions.
Direct & personal communication
SMS creates a direct and personal connection between brands and potential customers. With the ability to personalize messages based on customer preferences, past interactions, or purchase history, SMS helps brands build stronger relationships and trust.
Example: "Hi [Name], your favorite moisturizer is back in stock! Shop now before it’s gone: [link]."
💡Pro tip: Use first names, purchase history, or location-based offers to make SMS messages feel even more relevant and personal.
Real-time engagement
SMS enables businesses to engage with customers instantly. This makes SMS a preferred medium for promotions, updates, and limited-time offers. It allows for two-way conversations, where businesses can answer questions and send timely reminders when a lead is most interested.
💡 Pro tip: Use SMS for flash sales or time-sensitive deals—customers are more likely to act quickly when they receive an offer with a clear deadline.
Cost-effective marketing
SMS campaigns are a cost-effective way to engage potential customers and increase sales. With message costs ranging from $0.015 to $0.050 per SMS, businesses can reach large audiences without significant money spent.
Despite the low cost, SMS generates high response rates and a strong return on investment, making it an excellent text message lead generation tool for lead nurturing, promotions, and customer retention. For budget-conscious marketers, SMS offers maximum impact with minimal expense.
Example 1: A boutique clothing store replaces printed discount flyers with SMS promo codes, saving on printing costs while directly reaching active shoppers.
Example 2: Instead of investing in costly retargeting ads, a home décor brand uses SMS flash sale alerts to attract customers for exclusive discounts and limited-time offers
Automation & scalability
With SMS automation, businesses can send messages to thousands of customers efficiently. Automated workflows allow brands to set up welcome messages, abandoned cart reminders, or follow-ups without manual effort.
Whether you’re targeting a small segment or a nationwide audience, SMS can scale to meet your needs
💡 Pro tip: Set up an automated drip campaign to send SMS messages over time. This helps to guide potential customers toward a purchase.
Together, these advantages explain why more businesses are leveraging SMS for lead generation.
Proven SMS techniques for lead generation
You know SMS works—but how do you use it to drive more leads? Here are some tested strategies that top brands rely on to turn texts into conversions.
Offer exclusive content or discounts
People love getting something extra, especially when it feels exclusive. By offering discounts, special deals, or early access to new products via SMS, you create an immediate incentive for customers to respond.
Make sure your offer is time-sensitive to create urgency, which further motivates recipients to act quickly. Phrases like “For you only,” or “Exclusive offer just for our subscribers” can make recipients feel valued and increase the chances of conversion.

Create compelling CTAs for immediate action
Create your SMS messages with a clear, strong call-to-action (CTA) that urges instant response. Since texts are typically read quickly and have a character limit, use that brief moment to spark action.
Pro tip: Use action-oriented language like “Claim your offer now,” “Get started today,” or “Shop while stocks last” to prompt immediate responses.

Lead generation through SMS thrives when your CTA is clear, direct, and compels the recipient to act fast.
Use opt-in keywords and shortcodes
Simplify the process of joining your SMS list through keywords and shortcodes. For instance, you might advert JOIN to 12345 for updates.” This text-to-subscribe approach makes opt-ins instant. A customer sends a one-word text and is automatically added to your campaign.
Example:
A fitness apparel brand wants to grow its SMS list. They advertise:
“Text FIT to 56789 for 15% off your first order and exclusive updates!”
By texting “FIT” to 56789, customers are instantly added to the SMS list. This quick, frictionless opt-in process allows leads to sign up easily with just one text.
Pro tip: Make sure to choose an easy-to-remember keyword related to your campaign (e.g., text SALE, VIP, DEMO, etc.).
Segment your audience for targeted campaigns
One-size-fits-all messaging yields mediocre results. Instead, segment your SMS leads based on factors like demographics, purchasing behavior, and engagement history.
Example:
An online clothing store wants to send targeted offers. They segment their audience into two groups: frequent shoppers and seasonal browsers.
- Frequent shoppers: Receive exclusive offers like “Thanks for being a loyal customer! Enjoy 25% off your next order.”
- Seasonal browsers: Receive a message like “Welcome back! Get 15% off your next purchase, just for you.”
Businesses that segment their SMS campaigns see higher conversion because the messaging is more personalized and on-point.
Utilize SMS automation for timely follow-ups
Don’t rely on manual texting, set up automated SMS workflows that send follow-up messages, reminders, or abandoned cart notifications. These automated texts can remind customers about products they’ve left behind, share additional offers, or provide updates on the status of their orders.
SMS automation ensures no customer is left unattended and helps move prospects down the funnel with well-timed nudges.
Example:
An online home goods store uses SMS automation to follow up with leads.
- Welcome message: As soon as a customer subscribes, they receive an immediate “Welcome! Get 10% off your first order. Shop now!”
- Follow-up offer: If the customer hasn’t made a purchase within two days, they receive a reminder: “Still thinking it over? Here’s 15% off your first order!”
By implementing these techniques, you can steadily grow your list of SMS leads and keep them actively engaged.
Best practices for SMS lead generation
While SMS is powerful, success largely depends on how you use it. Here are some best practices to ensure your SMS lead generation campaigns are effective and well-received:
Personalize and be relevant
Treat SMS leads like individuals, not numbers on a list. Use personalization wherever possible—greet recipients by name and tailor messages to their interests or past interactions.
For example, if you know a customer’s preferred product category, mention it. Personalization shows that your texts are for them, which improves response rates.
In this SMS (image below), they address the customer by name (Elizabeth) and highlight their status as a “Platinum Comfort Crew member.” Personal touches like this make the recipient feel special and valued.

Optimal timing and frequency
A staggering 90% of consumers respond to a text within 30 minutes, which underscores the importance of reaching your audience at the right moment.
To maximize engagement, aim to send texts between 10 AM and 8 PM, avoiding early mornings before 8 AM, late evenings after 9 PM, Mondays, and rush hours. Mid-afternoon often works best.
When it comes to frequency, it’s all about balance. Nearly 60% of smartphone users opt out of a brand’s messages when they feel overwhelmed by too many updates.
Pro tip: Space out your messages and keep them meaningful—aim for one or two valuable texts per week to avoid overwhelming your audience and maintain engagement.
Keep messages concise and clear
SMS has a character limit, which means you must communicate your message clearly and concisely. Your text should get to the point quickly, without any unnecessary fluff.
Focus on one core message in each SMS, whether it's an offer, update, or reminder. Use short, direct language, and avoid long sentences or paragraphs.

For example, instead of saying, “We have a new collection of products that we think you might like, and it’s available on our website,” say, “New collection just dropped! Shop now and get 10% off!”
If more detail is needed, include a link to a mobile-friendly landing page for the lead to learn more.
Track and analyze performance
Treat SMS campaigns like any other marketing effort – track the results and adjust the strategy accordingly. Monitor key metrics such as open rate, click-through rate, response rate, and conversion rate.
Also, pay attention to unsubscribe rates after each SMS campaign. Analyzing these data points will tell you what’s working and what isn’t. You can experiment with A/B testing for different CTAs, message lengths, or timing to see what drives the best results
For instance, you may find that messages sent on Friday evenings receive higher engagement or that one offer generates more conversions than another. Use this insight to refine your approach, perhaps adjusting send times, wording, or segment targeting.
The role of SMS marketing automation in lead generation
Automation simplifies lead generation by handling manual tasks, ensuring no lead slips through the cracks. With SMS marketing automation, businesses can send the right message to the right lead at the right time—without manual effort for each interaction. This makes capturing and nurturing leads easier, faster, and more efficient.
Here’s why SMS automation is so important and how it works:
Key benefits of SMS marketing automation
✅ Instant follow-ups: Automatically send a welcome message as soon as a lead opts in, keeping them engaged from the start.
✅ Personalized offers: Use customer data to send relevant offers, product recommendations, and reminders tailored to their interests.
✅ Higher conversion rates: Schedule automated follow-ups to nurture leads, recover abandoned carts, or re-engage inactive customers.
✅ Timely touchpoints: Ensure leads receive timely updates, promotions, and reminders without manual effort.
✅Scalable communication: With the right SMS lead generation tool, you can manage high volumes of leads with automated workflows. This frees up your team while maintaining consistent outreach.
As a robust omnichannel customer engagement tool, Plivo CX checks all the boxes for a reliable and efficient SMS lead generation platform.
With its user-friendly interface and powerful analytics tools, Plivo CX optimizes your SMS marketing for maximum impact and streamlines your lead generation and conversion process with automation.
As a testament to its efficiency, Deckers Brands found Plivo's queuing system to be a game-changer. Jacob Martine, project manager at Deckers Brands, states,
"With fewer worries about rate limits and batch sizes, our developers face less burden. If we need to send 50,000 messages, we simply send them all—Plivo handles the rest, delivering without us worrying about the process."
Drive more leads with SMS marketing powered by Plivo CX
E-commerce managers face a tough challenge—reaching customers at the right time is harder than ever. Manual campaign management takes too long, and generic messages don’t drive conversions. Without automation and personalization, it’s easy to miss opportunities to connect with potential buyers
Plivo CX is an all-in-one customer engagement platform designed to maximize SMS lead generation results. It brings together real-time delivery, intelligent automation, and data-driven insights so businesses can capture and convert more leads via SMS.
Here’s how Plivo CX can get more leads by elevating your SMS marketing:
- Powerful audience targeting: Build highly focused campaigns by syncing your e-commerce platform data or importing contacts. With the Audiences feature, segment audiences based on purchase behavior, engagement data, and demographics to send highly personalized SMS campaigns.

- Multi-channel engagement: Connect with your customers on their preferred channels—whether it's SMS, MMS, or Email. This increases the chances of meaningful interactions and conversions.
- AI-powered SMS personalization: Use the Copywriter AI to generate compelling, data-driven SMS messages instantly. Fine-tune your messages to resonate with your audience instantly.

- Send messages at the ideal time: Automate and schedule messages to align with optimal timings across different time zones, ensuring they reach customers when they are most likely to engage, maximizing impact.

- E-commerce integrations: Effortlessly connect with e-commerce platforms like Shopify, WooCommerce, BigCommerce, and Magento to personalize and send SMS directly from your e-commerce platforms.
- Track conversions & optimize ROI: Gain valuable insights into what resonates with your audience and continuously optimize your campaigns for maximum ROI.

With Plivo CX’s robust global messaging network covering 220+ countries, businesses can scale their SMS marketing effortlessly, reducing costs by up to 70% while tripling ROI.
Plivo CX users generate an average of $71 for every $1 spent, making it a must-have for data-driven, high-impact SMS campaigns.
Don’t let missed opportunities hold your business back—start driving more leads and conversions today with Plivo CX.


How to Migrate Your Go Voice Application from Twilio to Plivo
Plivo's SMS API and Voice API enables businesses to communicate with their customers at global scale. Sign up for free now.
Migrating from Twilio to Plivo is a seamless and painless process. The two companies’ API structures, implementation mechanisms, XML structure, SMS message processing, and voice call processing are similar. We wrote this technical comparison between Twilio and Plivo APIs so that you can scope the code changes for a seamless migration.
Understanding the differences between Twilio and Plivo development
Most of the APIs and features that are available on Twilio are also available on Plivo and the implementation mechanism is easier as the steps involved are almost identical. This table gives a side-side comparison of the two companies’ features and APIs. An added advantage with Plivo is that not only can you code using the old familiar API/XML method, you can also implement your use cases using PHLO (Plivo High Level Objects), a visual workflow builder that lets you create workflows by dragging and dropping components onto a canvas — no coding required.
Plivo account creation
Start by signing up for a free trial account that you can use to experiment with and learn about our services. The free trial account comes with free credits, and you can add more as you go along. You can also add a phone number to your account to start testing the full range of our voice and SMS features. A page in our support portal walks you through the signup process.
You can also port your numbers from Twilio to Plivo, as we explain in this guide.
Migrating your voice application
As mentioned earlier, you can migrate your existing application from Twilio to Plivo by refactoring the code, or you can try our intuitive visual workflow builder PHLO. If you prefer the API approach, you can follow one of the voice quickstart guides based on your preferred language and web framework. Plivo offers server SDKs in seven languages: Python, Node.js, .NET, Java, Python, Ruby, and Go. For another alternative that lets you evaluate Plivo’s SMS APIs and their request and response structure, use our Postman collections.
How to make an outbound call
Let’s take a look at the process of refactoring the code to migrate your app from Twilio to Plivo to set up a simple Go application to make an outbound call by changing just a few lines of code.
Alternatively, you can implement the same functionality using one of our PHLO templates. For example, if you want to make an outbound call, your PHLO would be this:
How to receive an incoming call
You can migrate an application for receiving and handling an incoming call from Twilio to Plivo just as seamlessly, as in this example:
Here again, you can implement the same functionality using one of our PHLO templates. Your PHLO would look like:
For more information about migrating your Voice applications to Plivo, check out our detailed use case guides, available for all seven programming languages and PHLO.
How to forward an incoming call
You can migrate an application for forwarding an incoming call from Twilio to Plivo just as seamlessly, as in this example:
Here again, you can implement the same functionality using one of our PHLO templates. Your PHLO would look like:

For more information about migrating your Voice applications to Plivo, check out our detailed use case guides, available for all seven programming languages and PHLO.
More use cases
You can migrate your applications serving other use cases too.
- IVR
- Voice-controlled virtual assistant
- Number masking
- Supervisor coaching
- PINless conference
- Conference with PIN
- Voicemail
- Voice alerts broadcasting
- Voice survey
- Dial status reporting
- Screen incoming calls
- Record a call
Simple and reliable
And that’s all there is to migrate your Go voice application from Twilio to Plivo. Our simple APIs work in tandem with our Premium Communications Network. See for yourself — sign up for a free trial account.

How to Build a Text Autoresponder the No-Code Way Using PHLO
How to create a text autoresponder without writing a single line of code to respond to incoming messages on your business numbers.
This guide shows how to write an autoresponder for SMS text messages. Autoresponders can streamline marketing campaigns and subscription signups and reduce the amount of work humans have to do. You can create a text autoresponder either by using our PHLO visual workflow builder or our SMS API. Follow the instructions in one of the tabs below.
You can create and deploy a PHLO to implement an SMS autoresponder with a few clicks on the PHLO canvas.
How it works
Prerequisite
To get started, you need a Plivo account — sign up with your work email address if you don’t have one already. If you’re using a Plivo Trial account, you can send SMS messages only to phone numbers that have been verified with Plivo. You can verify (sandbox) a number by going to the console’s Phone Numbers > Sandbox Numbers page.
Create the PHLO
To create a PHLO, visit the PHLO page of the Plivo console. If this is your first PHLO, the PHLO page will be empty.
- Click Create New PHLO.
- In the Choose your use case pop-up, click Build my own. The PHLO canvas will appear with the Start node.Note: The Start node is the starting point of any PHLO. It lets you trigger a PHLO to start upon one of three actions: incoming SMS message, incoming call, or API request.
- If you plan to use a dynamic payload — passing values through parameters when you trigger the PHLO from your application — click on the Start node to open the Configuration pane. Under API Request, enter key names for the variables you want to use in your payload — for example, a list of numbers to send an SMS message to.
- Once you’ve configured the node, click Validate to save the configuration.
- From the list of components on the left-hand side, drag and drop the Send Message component onto the canvas. When a component is placed on the canvas it becomes a node.
- Draw a line to connect the Start node’s Incoming Message trigger state to the Send Message node.
- In the Configuration pane at the right of the canvas, configure the Send Message node with a sender ID in the From field. Enter the destination number you wish to send a message to in the To field. Put your message in the Text field.Note: You can define a static payload by specifying values when you create the PHLO, or define a dynamic payload by passing values through Liquid templating parameters when you trigger the PHLO from your application.
- Once you’ve configured the node, click Validate to save the configuration.
- After you complete the configuration, give the PHLO a name by clicking in the upper left, then click Save.
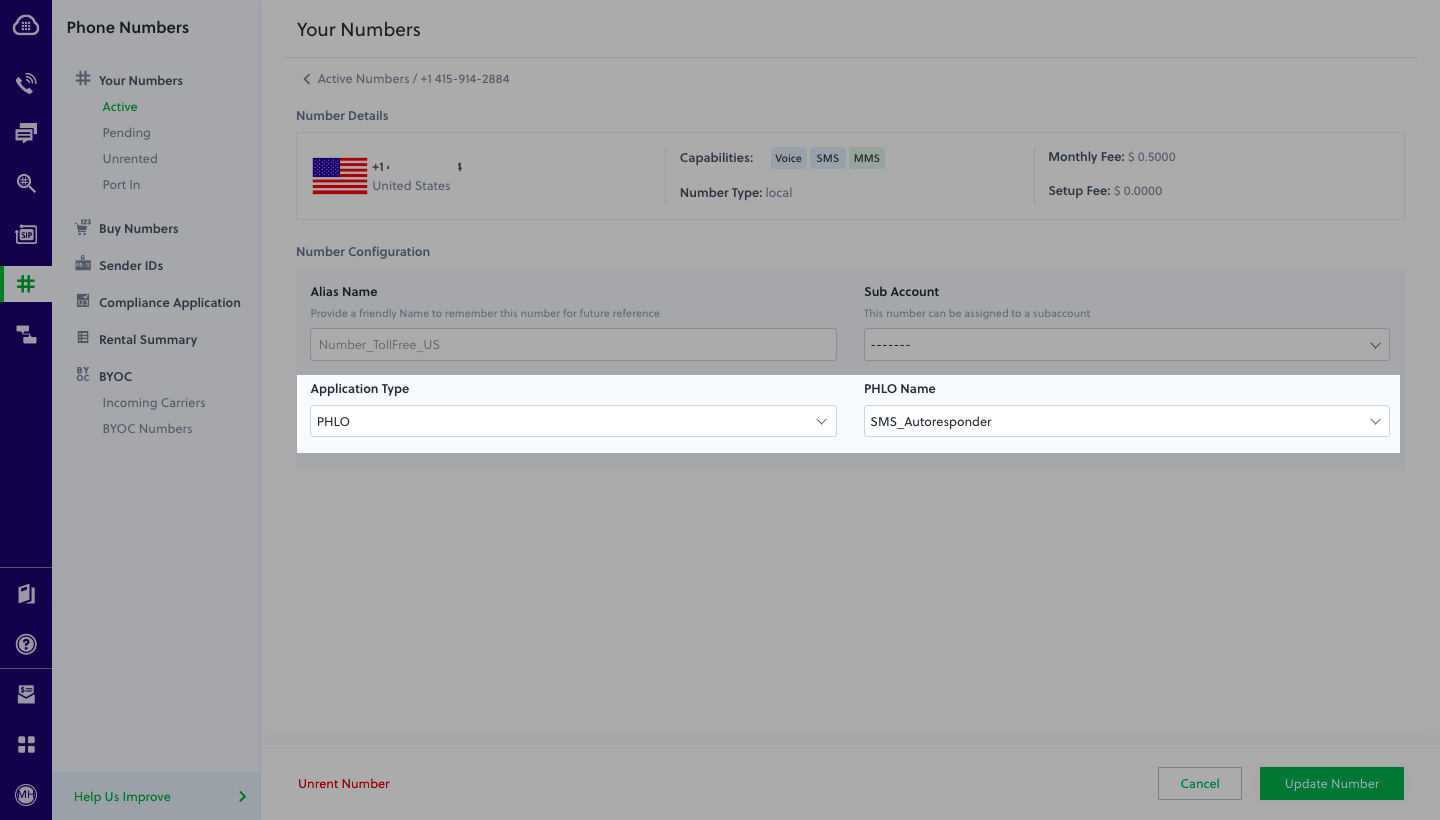
Assign the PHLO to a Plivo number
Once you’ve created and configured your PHLO, assign it to a Plivo number.
- On the Numbers page of the console, under Your Numbers, click the phone number you want to use for the PHLO.
- In the Number Configuration box, select PHLO from the Application Type drop-down.
- From the PHLO Name drop-down, select the PHLO you want to use with the phone number, then click Update Number.
Test
You can now send a message to your Plivo phone number and see how the autoresponder works.
For more information about creating a PHLO application, see the PHLO Getting Started guide. For information on components and their variables, see the PHLO Components Library.

What is MMS Messaging?
Detailed guide to MMS messaging at Plivo including the difference between SMS and MMS and how to get started.
What is MMS Messaging?
When you go out in public these days, few people are interacting with each other — typically, they’re all on their phones. But they aren’t talking — they’re sending GIFs, emojis, and short video clips. This visual content allows consumers to interact with each other and the messaging service that lets you incorporate images, audio, and video into text messages is MMS.
What does MMS mean?
MMS — Multimedia Messaging Service — allows your phone to send emojis, pictures, videos, GIFs, audio recordings, and other non-text content. MMS can be more personalized than a plain text message. While you can send an emoji in an SMS message, you can send a GIF in MMS to amplify the tone of your message.

MMS vs. SMS: Which is better for your use case?
An MMS with graphical elements can be visually engaging for message recipients. Corporate marketing departments have trouble getting potential customers to pay attention to their messages. The visual element that MMS provides can solve that problem. According to Salesmate, “Pop an emoji or emoticon in your subject lines, and your open rates could soar. 56% of brands that use emoticons in that way have higher open rates. It’s something your business can’t afford to neglect.”
MMS has unique strengths for several industries. Consider retail for instance — retailers can use MMS to send coupons with embedded QR codes, or receive product registrations that include images of barcodes or QR codes. We wrote a blog post about how retailers can take full advantage of MMS. Recommended uses include coupons and promotions, personal shopping, product registrations, and branded content. Even if you’re not a retailer, it has ideas you might be able to apply to your business.
You can use MMS for any of the same use cases as SMS. Check out our guide on getting started with SMS marketing for more information.
As MMS is such a personal form of communication, we advise businesses to be thoughtful about when and how they use it. A messaging strategy loses its power when you inundate consumers with irrelevant messages or send messages too often or at inconvenient times, such as when they’re settling into bed for the night.
Plivo’s MMS API
Make sure to work with a high-quality MMS API provider that can provide the features, network, and infrastructure needed to help make your strategy successful. Our guide to choosing an SMS API provider details what you should look for from your SMS/MMS provider. Ultimately you’re looking for an API solution that makes it easy for developers to programmatically send and receive messages, that also leverages the cloud for scalability, and that runs on a global communications network to intelligently and cost-effectively route messages.
The Plivo MMS API lets you send and receive pictures and videos across phone numbers in the US and Canada. Several key features let you easily engage your customers visually.
- You can send and receive MMS messages across the US and Canada via multiple sender types, including long code and toll-free numbers.
- Choose between a variety of multimedia formats, such as image files (JPEG, GIF), emojis, audio (MP3), and video (MP4), for a rich multimedia experience.
- The API intelligently resizes your images to ensure the best delivery across different carrier networks.
- Plivo provides multimedia storage for both inbound and outbound MMS messages for easy access and reuse.
- The API can convert multimedia messages into SMS when you’re sending messages to MMS-incompatible phone numbers.
- Message queuing retries concurrent messaging requests to comply with carrier regulations and offers increased deliverability.
MMS on Powerpack
Plivo’s Powerpack provides a set of features that make message communication at scale more effective and reliable, ensuring that your SMS and MMS messages get delivered at whatever scale you’re sending them, to any country. Powerpack automates all of the complex logic that you would otherwise have to code manually. It’s designed to meet large-scale message throughput and volume requirements. By automatically distributing your overall messaging traffic across a pool of source numbers, Powerpack guarantees that you stay compliant with throughput limits and that your MMS messages get delivered.
Get started with MMS at Plivo
Not sure how to use Plivo for MMS? We’ve written Getting Started guides to sending MMS and receiving MMS for developers who use Node.js, Ruby, Python, PHP, .NET (C#), Java, and Go. And if those aren’t enough, we’ve got answers to several MMS questions in our support portal.
Our competitive pricing starts at $0.0080 for inbound and $0.0160 for outbound MMS messages. Pricing is pay-as-you-go, but discounts may apply to messages sent at higher volumes; you can contact our sales team for higher volume enrollment. Additional carrier surcharge fees may apply to all inbound and outbound MMS usage rates.
Sign up for a free trial of Plivo’s MMS API and automate sending MMS messages to US and Canada phone numbers today.

How to Migrate Your Ruby Voice Application from Twilio to Plivo
Plivo's SMS API and Voice API enables businesses to communicate with their customers at global scale. Sign up for free now.
Migrating from Twilio to Plivo is a seamless and painless process. The two companies’ API structures, implementation mechanisms, XML structure, SMS message processing, and voice call processing are similar. We wrote this technical comparison between Twilio and Plivo APIs so that you can scope the code changes for a seamless migration.
Understanding the differences between Twilio and Plivo development
Most of the APIs and features that are available on Twilio are also available on Plivo and the implementation mechanism is easier as the steps involved are almost identical. This table gives a side-side comparison of the two companies’ features and APIs. An added advantage with Plivo is that not only can you code using the old familiar API/XML method, you can also implement your use cases using PHLO (Plivo High Level Objects), a visual workflow builder that lets you create workflows by dragging and dropping components onto a canvas — no coding required.
Plivo account creation
Start by signing up for a free trial account that you can use to experiment with and learn about our services. The free trial account comes with free credits, and you can add more as you go along. You can also add a phone number to your account to start testing the full range of our voice and SMS features. A page in our support portal walks you through the signup process.
You can also port your numbers from Twilio to Plivo, as we explain in this guide.
Migrating your voice application
As mentioned earlier, you can migrate your existing application from Twilio to Plivo by refactoring the code, or you can try our intuitive visual workflow builder PHLO. If you prefer the API approach, you can follow one of the voice quickstart guides based on your preferred language and web framework. Plivo offers server SDKs in seven languages: Python, Node.js, .NET, Java, Python, Ruby, and Go. For another alternative that lets you evaluate Plivo’s SMS APIs and their request and response structure, use our Postman collections.
How to make an outbound call
Let’s take a look at the process of refactoring the code to migrate your app from Twilio to Plivo to set up a simple Ruby application to make an outbound call by changing just a few lines of code.
Alternatively, you can implement the same functionality using one of our PHLO templates. For example, if you want to make an outbound call, your PHLO would be this:
How to receive an incoming call
You can migrate an application for receiving and handling an incoming call from Twilio to Plivo just as seamlessly, as in this example:
Here again, you can implement the same functionality using one of our PHLO templates. Your PHLO would look like:
For more information about migrating your Voice applications to Plivo, check out our detailed use case guides, available for all seven programming languages and PHLO.
How to forward an incoming call
You can migrate an application for forwarding an incoming call from Twilio to Plivo just as seamlessly, as in this example:
Here again, you can implement the same functionality using one of our PHLO templates. Your PHLO would look like:
For more information about migrating your Voice applications to Plivo, check out our detailed use case guides, available for all seven programming languages and PHLO.
More use cases
You can migrate your applications serving other use cases too.
- IVR
- Voice-controlled virtual assistant
- Number masking
- Supervisor coaching
- PINless conference
- Conference with PIN
- Voicemail
- Voice alerts broadcasting
- Voice survey
- Dial status reporting
- Screen incoming calls
- Record a call
Simple and reliable
And that’s all there is to migrate your Ruby Voice app from Twilio to Plivo. Our simple APIs work in tandem with our Premium Communications Network. See for yourself — sign up for a free trial account.

How to Migrate Your Ruby SMS Application from Twilio to Plivo
Plivo's SMS API and Voice API enables businesses to communicate with their customers at global scale. Sign up for free now.
Migrating your Ruby SMS app from Twilio to Plivo is a seamless and painless process. The two companies’ API structures, implementation mechanisms, XML structure, SMS message processing, and voice call processing are similar. We wrote this technical comparison so that you can scope between Twilio and Plivo APIs for a seamless migration.
Understanding the differences between Twilio and Plivo development
Most of the APIs and features that are available on Twilio are also available on Plivo and the implementation mechanism is easier as the steps involved are almost identical. This table gives a side-side comparison of the two companies’ features and APIs. An added advantage with Plivo is that not only can you code using the old familiar API/XML method, you can also implement your use cases using PHLO (Plivo High Level Objects), a visual workflow builder that lets you create workflows by dragging and dropping components onto a canvas — no coding required.
Plivo offers one unique advantage: Not only can you code using APIs and XML, you can also implement your use cases using PHLO (Plivo High Level Objects), a visual workflow builder that lets you create workflows by dragging and dropping components onto a canvas — no coding required.
Plivo account creation
Start by signing up for a free trial account that you can use to experiment with and learn about our services. The free trial account comes with free credits, and you can add more as you go along. You can also add a phone number to your account to start testing the full range of our voice and SMS features. A page in our support portal walks you through the signup process.
You can also port your numbers from Twilio to Plivo, as we explain in this guide.
Migrating your Ruby SMS application
You can migrate your existing application from Twilio to Plivo by refactoring the code, or you can try our intuitive visual workflow builder PHLO. To continue working with the APIs, use one of the quickstart guides to set up a development environment for your preferred language. Plivo offers server SDKs in seven languages: Python, Node.js, .NET, Java, Python, Ruby, and Go. For another alternative that lets you evaluate Plivo’s SMS APIs and their request and response structure, use our Postman collections.
How to send an SMS message
Let’s take a look at the process of refactoring the code to migrate your app from Twilio to Plivo to set up a simple Ruby application to send an SMS message by changing just a few lines of code.
Alternatively, you can implement the same functionality using one of our PHLO templates. For example, if you want to send an SMS message, your PHLO would be this:

How to receive and reply to SMS
You can migrate an application for receiving and replying to an incoming SMS from Twilio to Plivo just as seamlessly, as in this example:
Here again, you can implement the same functionality using one of our PHLO templates. Your PHLO would look like:

For more information about migrating your SMS applications to Plivo, check out our detailed use case guides, available for all seven programming languages and PHLO.
How to send an MMS message
Let’s take a look at the process of refactoring the code to migrate your app from Twilio to Plivo to set up a simple Ruby application to send an MMS message by changing just a few lines of code.
Alternatively, you can implement the same functionality using one of our PHLO templates. For example, if you want to send an MMS message, your PHLO would be this:

More use cases
You can migrate your applications serving other use cases too.
- Two-factor authentication
- Forward incoming SMS
- Delivery reports
- SMS alerts
- SMS marketing
- SMS notifications
- SMS survey
- SMS autoresponder
- Forward SMS to email
- Receive MMS
Simple and reliable
And that’s all there is to migrate your Ruby SMS app from Twilio to Plivo. Our simple APIs work in tandem with our Premium Communications Network to guarantee the highest possible delivery rates and the shortest possible delivery times for your SMS messages. See for yourself — sign up for a free trial account.

How to Build a Virtual Assistant App the No-Code Way Using PHLO
Create an IVR phone tree that can act as a virtual assistant to manage multiple menus with prerecorded messages and manage call routing.
Interactive voice response (IVR) systems let incoming callers access information and find contacts via a menu of pre-recorded messages, without having to speak to an agent, and let you automate polling via outgoing calls. Callers and call recipients can respond to prompts via Touch-Tone keypad presses or speech recognition. IVR systems can handle larger call volumes than operators and reduce costs associated with customer service.
Common IVR use cases include:
- Auto-attendant: You can replace a receptionist with an IVR system that routes calls to agents during business hours and accepts voicemail when no one is available.
- Call center: You can route calls coming in to call centers to the appropriate representatives based on user input.
- Surveys, polling, and voting: You can implement IVR in outbound calls to collect customer satisfaction scores or conduct political polling.
- Appointment reminders: You can send automated reminders to customers before their scheduled visits to help avoid missed appointments and facilitate rescheduling.
- Lead assignment and lead routing: For inbound sales calls, you can set up an IVR menu with a set of qualifying questions to discover a customer’s interests, then redirect their call to a representative based on their responses.
This guide shows how to build an IVR menu system on the Plivo platform, either by using our PHLO visual workflow builder or our APIs and XML documents. This post talks about how to do it with PHLO.
Prerequisites
To get started, you need a Plivo account — sign up with your work email address if you don’t have one already. To receive incoming calls, you must have a voice-enabled Plivo phone number. You can rent numbers from the Numbers page of the Plivo console, or by using the Numbers API.
How it works
You can create and deploy a workflow to implement an IVR system with a few clicks on the PHLO canvas.
Create a PHLO to build a virtual assistant
To create a PHLO, visit the PHLO page of the Plivo console. If this is your first PHLO, the PHLO page will be empty.
- Click CREATE NEW PHLO.
- In the Choose your use case pop-up, click Build my own. The PHLO canvas will appear with the Start node.
Note: The Start node is the starting point of any PHLO. It lets you trigger a PHLO to start upon one of three actions: incoming SMS message, incoming call, or API request. - Click the Start node to open the Configuration tab, then enter information that other nodes can retrieve in the API Request section — in this case, the From and optionally To numbers for the IVR system.
- From the list of components on the left side, drag and drop the IVR Menu component onto the canvas. When a component is placed on the canvas it becomes a node.
- Draw a line to connect the Start node‘s Incoming Call trigger state to the IVR Menu node.
- In the Configuration tab at the right of the canvas, configure the choices for the IVR menu. For this example, select 1 and 2 as allowed choices. Enter a message to play to the user in the Speak Text box.
- Once you’ve configured the node, save the configuration by clicking Validate. Do the same for each node as you go along.
- Drag and drop two instances of the Call Forward component onto the canvas. Rename them Connect_to_Support and Connect_to_Sales. Draw lines to connect the IVR Menu node‘s 1 and 2 trigger states to the new nodes.
- Configure each Call Forward node to select the From number using a variable. PHLO will get the number from the key/value pairs set in the Start node. Enter two curly brackets to view all available variables, and choose the appropriate one. For the To number, either enter a fixed number directly into the To field or use a variable that you configured in the Start node.
- Drag and drop two instances of the Play Audio component onto the canvas. Rename the two nodes No_Input_Prompt and Invalid_Input_Prompt and configure each to speak a fixed message for callers to hear when they enter no input or invalid input. Draw lines from the IVR Menu node‘s No Input and Wrong Input trigger states to the respective nodes, then draw lines from the Prompt Completed trigger states of the new nodes back to the IVR Menu node, to give callers another chance to enter a menu choice.
- Give the PHLO a name by clicking in the upper left, then click Save.
Your complete PHLO should look like this.
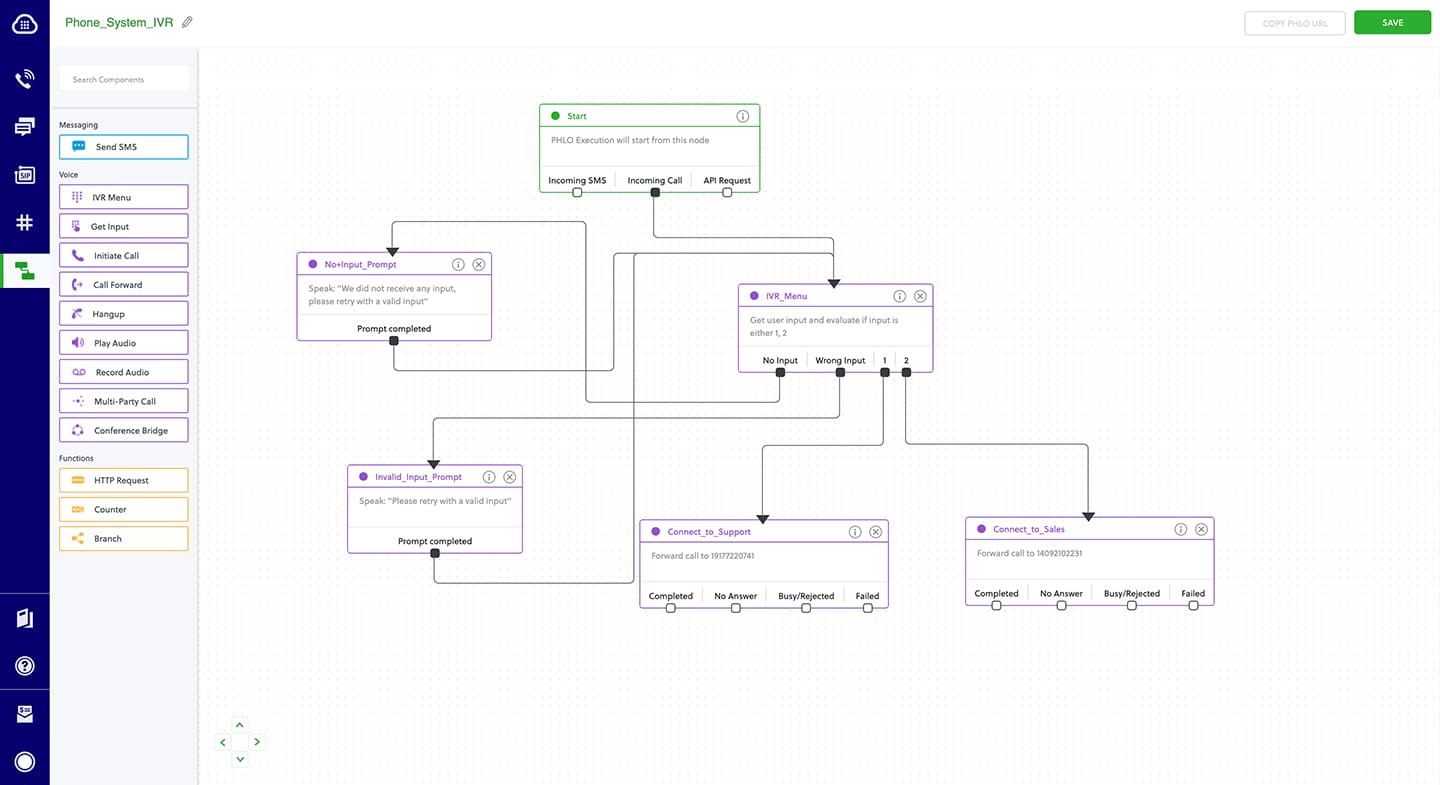
Refer to the Create the PHLO section in our use case guide for more information.
Assign the PHLO to a Plivo number
Once you‘ve created and configured your PHLO, assign it to a Plivo number.
- On the Numbers page of the console, under Your Numbers, click the phone number you want to use for the PHLO.
- In the Number Configuration box, select PHLO from the Application Type drop-down.
- From the PHLO Name drop-down, select the PHLO you want to use with the phone number, then click Update Number.

Test
You can now call your Plivo phone number and see how the IVR system works.
For more information about creating a PHLO application, see the PHLO Getting Started guide. For information on components and their variables, see the PHLO Components Library.

Guide to Plivo’s Premium Communications Network
Plivo’s Premium Communications Network comprises 1,600+ telecom provider networks and connectivity in 190+ countries. Learn more about Plivo’s infrastructure.
Plivo’s Premium Communications Network
No other cloud communication platform can match Plivo’s Premium Communications Network (PCN), because it’s taken us 10 years to build it through the careful addition of Tier 1 carrier networks all across the globe. It’s a key competitive advantage that allows Plivo customers to take advantage of a network that delivers high call quality and message deliverability.
A global carrier network
Plivo’s PCN serves a worldwide audience of voice and messaging customers — we have direct relationships with more than 1,600+ carrier networks and connectivity in 190+ countries. Our strict evaluation process approves only carriers that meet the highest industry standards. To ensure top performance for customers in every region, we’ve established seven points of presence (PoP) that correspond to internet exchange points (IXP) in every region around the globe. That means calls outside the local region are routed to their destinations with minimal latency, ensuring maximum voice quality.
Built for reliability
Top performance demands top reliability. We connect with at least two local or Tier 1 direct carriers in each country so we can eliminate multiple hops, lower the overhead of routing, reduce latency, and give our customers the best connections possible. Having multiple carrier connections also gives our customers built-in redundancy to ensure that, in the event of a carrier failure, all voice traffic is automatically routed through alternative carriers to minimize service disruption and quality degradation.
Our PCN delivers a number of practical benefits for our customers, including guaranteed CLI (caller ID) and instant phone number provisioning in every country. Because Plivo manages carrier relationships for our customers, we have a complete end-to-end view of every connection, so we can identify issues and work with carriers to get problems solved, sometimes before our customers even know something went wrong.
Learn more about all the benefits in our free ebook Premium Communications Network: Simplified Cloud-Based Telecom Carrier Infrastructure. You’ll see why no other CPaaS can match our infrastructure.

Build Click-to-Call Using PHLO
How To Build Click to Call Using PHLO | Implement click-to-Call on your website to enable users to engage with your team using JavaScript code via Node.js
Click-to-call lets your website users engage with your support and sales teams on your website. Sometimes users might want to speak to someone via their handset but initiate the call online, or they might want to talk to someone directly from the website. You can implement either use case using Plivo’s Browser SDK.
To get started, you need a Plivo account — sign up with your work email address if you don’t have one already. You must have a voice-enabled Plivo phone number to receive incoming calls; you can rent numbers from the Numbers page of the Plivo console, or by using the Numbers API. Click to call requires JavaScript; we recommend using Node.js. If this is your first time triggering a PHLO with Node.js, follow our instructions to set up a Node.js development environment and a web server and safely expose that server to the internet.
Build the PHLO
To create a PHLO, visit the PHLO page of the Plivo console. If this is your first PHLO, the PHLO page will be empty.
- Click Create New PHLO.
- In the Choose your use case pop-up, click Build my own. The PHLO canvas will appear with the Start node. The Start node is the starting point of any PHLO. It lets you trigger a PHLO to start upon one of three actions: incoming SMS message, incoming call, or API request.
- Click the Start node to open the Configuration tab, and then enter the information to retrieve from the HTTP Request payload — in this case key names are destinationNumber and phoneMeNumber. The values will remain blank as we will receive them when the request is made by the browser.
- Validate the configuration by clicking Validate. Do the same for each node as you go along.
- From the list of components on the left side, drag and drop the Initiate Call component onto the canvas. This adds an Initiate Call node onto the canvas. When a component is placed on the canvas it becomes a node.
- Draw a line to connect the Start node’s API Request trigger state to the Initiate Call node.
- In the Configuration tab of the Initiate Call node, give the node a name. To enter values for the From and To fields, enter two curly brackets to view all available variables, and choose the appropriate ones. The values for the numbers will be retrieved from the HTTP Request payload you defined in the Start node. Here From is 14159142884 and To is {{Start.http.params.phoneMeNumber}}.
- From the list of components on the left side, drag and drop the Call Forward component onto the canvas. Draw a line to connect the Answered trigger state of the Initiate Call node with the Call Forward node.
- Configure the Call Forward node to initiate call forward to another user. To enter values for the From and To fields, enter two curly brackets to view all available variables, and choose the appropriate ones. The values for the numbers will be retrieved from the HTTP Request payload you defined in the Start node. Here From is {{Start.http.params.phoneMeNumber}} and To is {{Start.http.params.destinationNumber}}.
- After you complete and validate the node configurations, give the PHLO a name by clicking in the upper left, then click Save.
- From the list of components on the left side, drag and drop the Call Forward component onto the canvas.
- Draw a line to connect the Start node’s Incoming call trigger state to the Call Forward node.
- In the Configuration tab of the Call Forward node, give the node a name. To enter values for the From and To fields, enter two curly brackets to view all available variables, and choose the appropriate ones. The values for the numbers will be retrieved from the HTTP Request payload you defined in the Start node. Here From is {{Start.http.params.header1}}. and To is {{Start.http.params.to}}.
- After you complete and validate the node configurations, give the PHLO a name by clicking in the upper left, then click Save.
Your complete PHLO should look like this:

Copy our demo application
- You need a little code to trigger the PHLO, but we’ve written it for you. Clone the repository from GitHub.
$ git clone https://github.com/plivo/click2call-webRTC.git
- Change your working directory to click2call-webRTC.
$ cd click2call-webRTC
- Install dependencies using the npm package manager, which uses the package.json file to specify the packages a project depends on.
$ npm install
- Edit the .env file.
PORT="8080";
PLIVO_AUTH_ID="<auth_id>";
PLIVO_AUTH_TOKEN="<auth_token>";
PHLO_ID="<phlo_url>";
Replace the auth placeholders with your authentication credentials from the Plivo console. Enter your PHLO ID, which you can also find on the Plivo console.
Edit /client/src/index.jsx and replace the <caller_id> placeholder with a Plivo number.
What the code does
Turn to our documentation for a full walkthrough of the code. It explains what happens when someone clicks on an application button to initiate a call, along with code snippets.
To trigger the PHLO, you must assign it to a Plivo phone number. To do that, visit the Numbers page of the console, and under Your Numbers click the phone number you want to use for the PHLO.
In the Number Configuration box, select PHLO from the Application Type drop-down.
From the PHLO Name drop-down, select the PHLO you want to use with the phone number, then click Update Number.
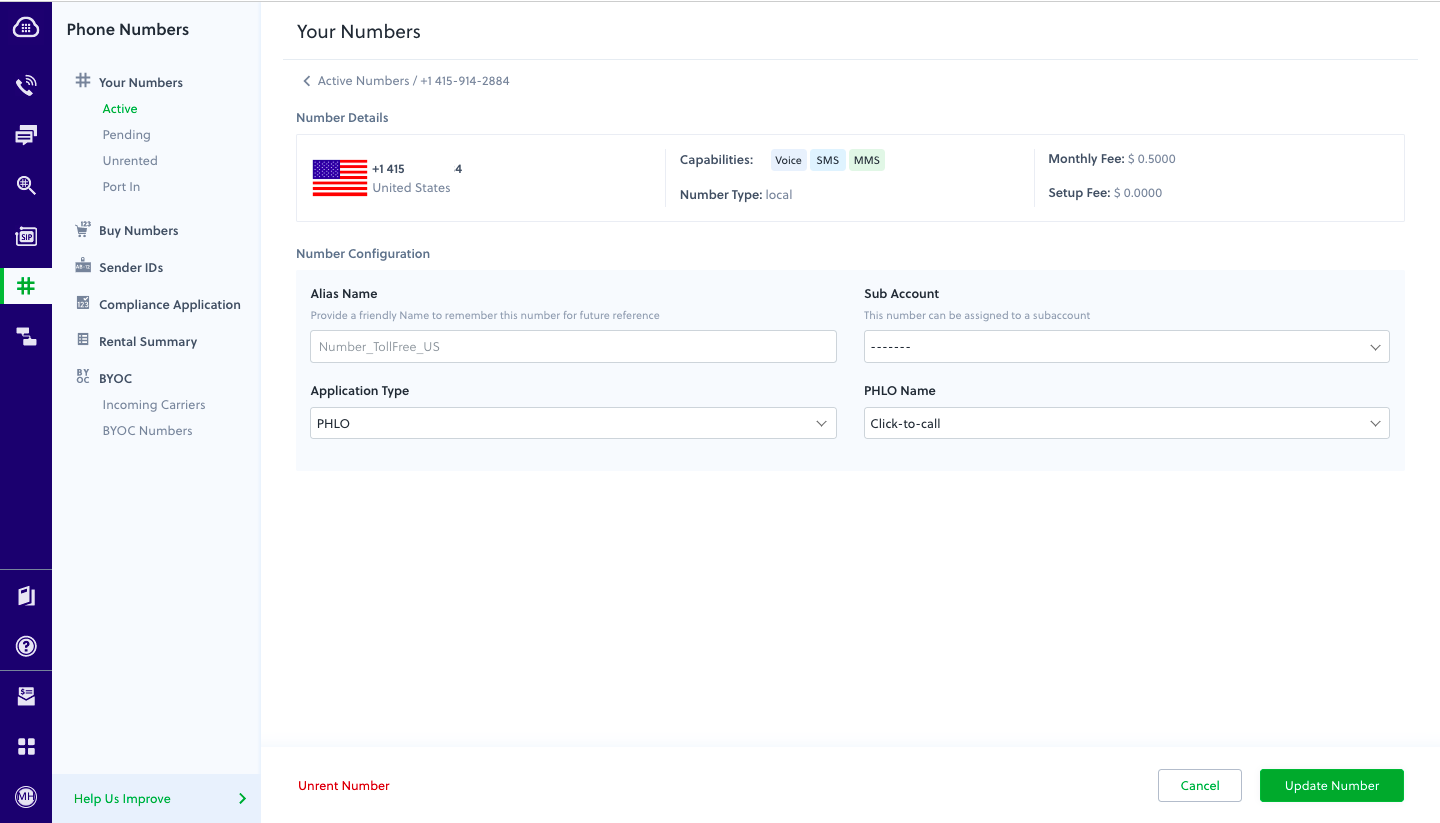
Try it out
To see the PHLO in action, run npm run watch and npm run start. You can then go to http://localhost:8080/ to see the application. To make it available to the internet, set up ngrok.
Before you try it out, be aware that if you’re using a Plivo Trial account, you can make calls only to phone numbers that have been verified with Plivo. You can verify (sandbox) a number by going to the console’s Phone Numbers > Sandbox Numbers page.
Haven’t tried Plivo yet? Getting started is easy and only takes minutes. Sign up today.

How to Migrate Your .NET SMS Application from Twilio to Plivo
Plivo's SMS API and Voice API enables businesses to communicate with their customers at global scale. Sign up for free now.
Migrating your .NET SMS app from Twilio to Plivo is a seamless and painless process. The two companies’ API structures, implementation mechanisms, XML structure, SMS message processing, and voice call processing are similar. We wrote this technical comparison so that you can scope between Twilio and Plivo APIs for a seamless migration.
Understanding the differences between Twilio and Plivo development
Most of the APIs and features that are available on Twilio are also available on Plivo and the implementation mechanism is easier as the steps involved are almost identical. This table gives a side-side comparison of the two companies’ features and APIs. An added advantage with Plivo is that not only can you code using the old familiar API/XML method, you can also implement your use cases using PHLO (Plivo High Level Objects), a visual workflow builder that lets you create workflows by dragging and dropping components onto a canvas — no coding required.
Plivo offers one unique advantage: Not only can you code using APIs and XML, you can also implement your use cases using PHLO (Plivo High Level Objects), a visual workflow builder that lets you create workflows by dragging and dropping components onto a canvas — no coding required.
Plivo account creation
Start by signing up for a free trial account that you can use to experiment with and learn about our services. The free trial account comes with free credits, and you can add more as you go along. You can also add a phone number to your account to start testing the full range of our voice and SMS features. A page in our support portal walks you through the signup process.
You can also port your numbers from Twilio to Plivo, as we explain in this guide.
Migrating your .NET SMS application
You can migrate your existing application from Twilio to Plivo by refactoring the code, or you can try our intuitive visual workflow builder PHLO. To continue working with the APIs, use one of the quickstart guides to set up a development environment for your preferred language. Plivo offers server SDKs in seven languages: Python, Node.js, .NET, Java, Python, Ruby, and Go. For another alternative that lets you evaluate Plivo’s SMS APIs and their request and response structure, use our Postman collections.
How to send an SMS message
Let’s take a look at the process of refactoring the code to migrate your app from Twilio to Plivo to set up a simple Java application to send an SMS message by changing just a few lines of code.
Alternatively, you can implement the same functionality using one of our PHLO templates. For example, if you want to send an SMS message, your PHLO would be this:
How to receive and reply to SMS
You can migrate an application for receiving and replying to an incoming SMS from Twilio to Plivo just as seamlessly, as in this example:
Here again, you can implement the same functionality using one of our PHLO templates. Your PHLO would look like:
For more information about migrating your SMS applications to Plivo, check out our detailed use case guides, available for all seven programming languages and PHLO.
How to send an MMS message
Let’s take a look at the process of refactoring the code to migrate your app from Twilio to Plivo to set up a simple Java application to send an MMS message by changing just a few lines of code.
Alternatively, you can implement the same functionality using one of our PHLO templates. For example, if you want to send an MMS message, your PHLO would look like this:
More use cases
You can migrate your applications serving other use cases too.
- Two-factor authentication
- Forward incoming SMS
- Delivery reports
- SMS alerts
- SMS marketing
- SMS notifications
- SMS survey
- SMS autoresponder
- Forward SMS to email
- Receive MMS
Simple and reliable
And that’s all there is to migrate your .NET SMS application from Twilio to Plivo. Our simple APIs work in tandem with our Premium Communications Network to guarantee the highest possible delivery rates and the shortest possible delivery times for your SMS messages. See for yourself — sign up for a free trial account.
It’s easy to get started. Sign up for free.
Create your account and receive trial credits or get in touch with us.
